
Blue Team Basics - Honeynets

Creating a honeynet
"All warfare is based on deception....when we are near, we must make the enemy believe we are far away" Sun Tzu, The Art of War
Introduction
A honeypot or numerous honeypot's (a honeynet) purpose is to gather threat intelligence (TTPs), divert attack efforts and fundamentally detect attacks. A honeypot is a controlled vulnerable system created to lure attackers.
There are 3 types of honeypots; low, medium and high interaction. Each provide varying levels of intelligence depending on how complicated they are to set up. Low interaction being the easiest but providing the least intelligence.
Honeypots can be used as an early warning system.
This guide will get you up to speed with the basic honeypots as well as providing you with a secure deployment of a honeynet system.
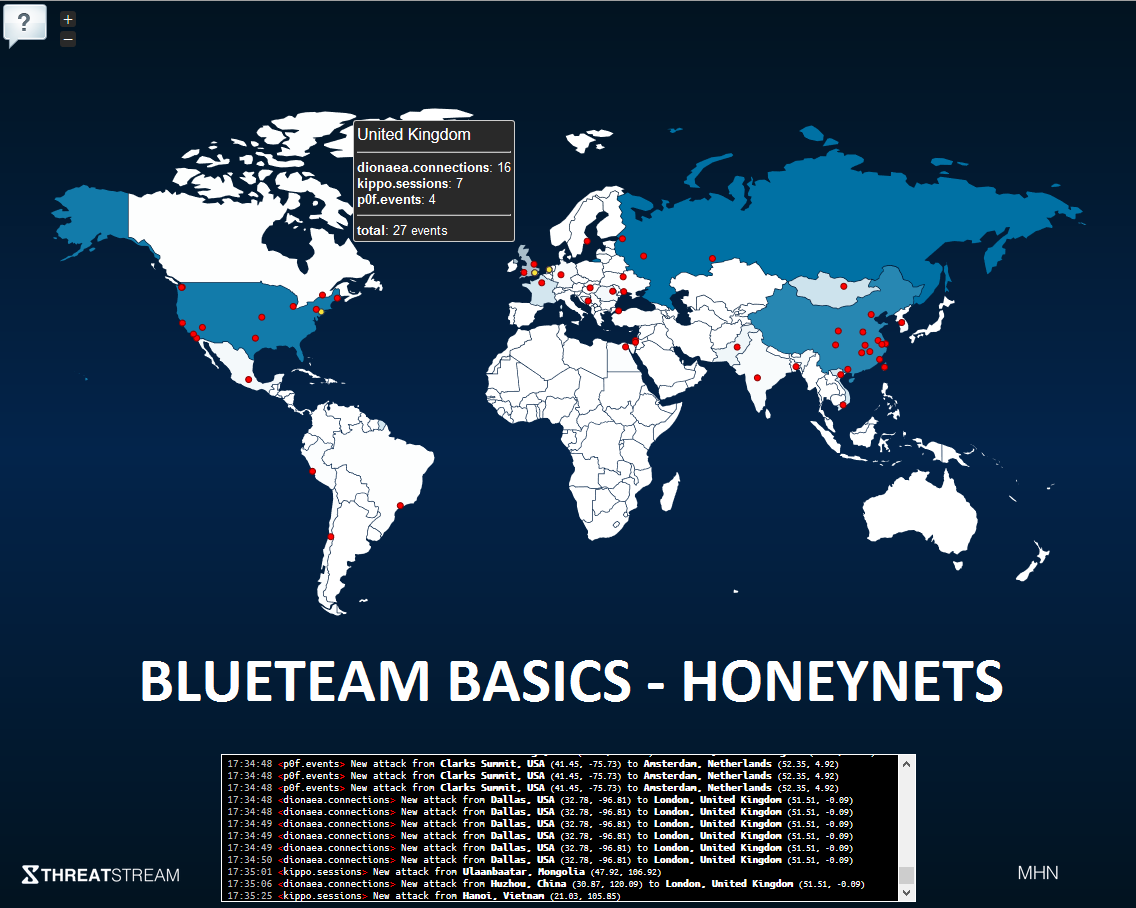
Modern Honey Network (MHN) by Anomali (previously ThreatStream) is a honeypot management system. It utilises the HPfeeds protocol to centralise the data into a mongodb instance for analysis.
Design
MHN consists of a management server and one or many honeypots.
Management Server - Secure it down as much as possible by running it behind an IPS/IDS, I opted to host it internally using a DMZ behind a WAF. This way I could virtualise the server and keep it for reuse. The honeypots can be rapidly deployed plus most the configuration is done on the management server.
The management server was built with an Ubuntu 14.04 LTS server 2 vCPU, 4 GB RAM, 30Gb SSD.
Finally, I highly recommend using Cloudflare to manage DNS as well as providing a global CDN, DDoS protection and firewall capabilities. Tip: enable 2FA when creating your account. Also, CF now supports web sockets for non-business customers! (which is handy for the MHN Honey Map).
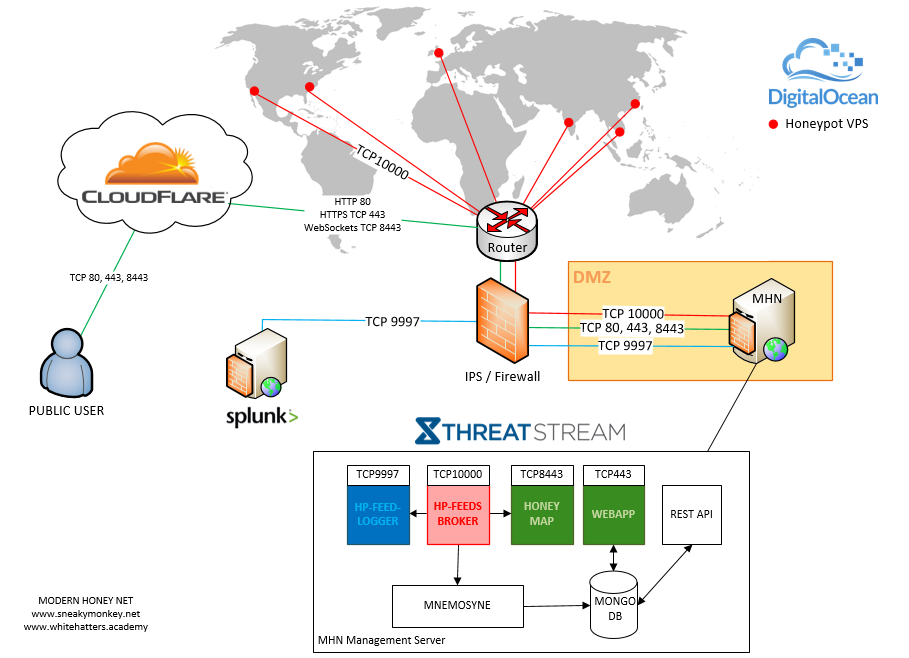
Honeypots - I used Digital Ocean generated VPSs (other providers; UK2/Linode/EC2/OVH). Another bonus is that they provide pre-built distributions for quick deployment, ideal for honeypots/throw-away servers. Fancy Digital Ocean? then use my referral code to start you off with $10 credit.
MHN’s main advantage is the simplicity of deployment. Here is a quick breakdown of each supported honeypot;

-
Snort: Snort is not a honeypot per se but an IDS/IPS very helpful to detect attacks on your network, Sourcefire (the creator of Snort) was a acquired by Cisco but the product Snort remains OpenSource.
-
Suricata: Suricata is also an IDS/IPS, it has not been as longer as Snort but has a great community and is fast.
-
Dionaea: Dionaea is a low interaction honeypot it exposes services like SMB, MSSQL, SIP, HTTP, FTP, TFTP.
-
Glastopf: Glastopf is a very popular Honeypot that has the ability to emulate thousands of web vulnerabilities, it is actively maintained.
-
Kippo: Kippo is a medium interaction ssh honeypot, has the ability to upload and download files and other nice features
-
Cowrie: Fork of Kippo. Added ‘ssh exec commands’ support, SFTP support, SCP support, direct-tcpip (proxying) support and many other features
-
p0f: p0f is a tool that that uses passive fingerprinting to identify the OS behind a TCP connection
-
Conpot: Conpot is a low interaction Industrial Control Systems honeypot and basically emulates some protocols used in industrial environments.
-
Wordpot: Wordpot is a WordPress emulator honeypot it is still maintained and could be expanded using plugins
-
ShockPot: ShockPot is a webapp honeypot that expose the vulnerability CVE-2014-6271
-
Elastic Honey: A simple honeypot designed to mimic a vulnerable Elasticsearch (ES) instance. CVE-2015-1427
-
Thug: is a client-side honeypot (honeyclient) that emulates a web browser. It is designed to automatically interact with the malicious website to explore its exploits and malicious artifacts, often in the form of JavaScript.
Management Server Installation
Before we deploy any honeypots we need a management server.
-
Spin up a Ubuntu server (12.04/14.04 for best support)
-
Install NGINX webserver
apt-get update
apt-get install nginx -y
- Install MHN
mkdir /opt && cd /opt/
apt-get install git -y
git clone https://github.com/threatstream/mhn.git
cd mhn/
./install.sh
Give it ~5 minutes (it should import 19,000+ IDS rules from Emerging Threats), complete the config wizard to finish up.
- Check all services are started
supervisorctl status
geoloc                           RUNNING
honeymap                         RUNNING
hpfeeds-broker                   RUNNING
hpfeeds-logger-splunk            RUNNING
mhn-celery-beat                  RUNNING
mhn-celery-worker                RUNNING
mhn-collector                    RUNNING
mhn-uwsgi                        RUNNING
mnemosyne                        RUNNING
- BUG Fix permissions for mhn-celery-beat service if it crashed.
chown www-data /var/log/mhn/mhn.log
chmod 600 /var/log/mhn/mhn.log
- Restart the crashed service
supervisorctl start mhn-celery-beat
- After the installation wizard has finished, you can still manually change the config if needed;
vim /opt/mhn/server/config.py
- Now its started connect to the web front end http://yourdomain.com
Your basic HTTP honeypot management server is now setup.
Enable MHN SSL under Nginx.
- Generate a stronger DHE parameter (needed for HSTS):
cd /etc/ssl/certs
openssl dhparam -out dhparam.pem 4096
- Create these under /etc/nginx/sites-available/
vim /etc/nginx/sites-available/mhn-http
server {
    listen       80;
    server_name  yourdomain.com;

    location / {
        try_files $uri @mhnserver;
    }

    root /opt/mhn/server;

    location @mhnserver {
      include uwsgi_params;
      uwsgi_pass unix:/tmp/uwsgi.sock;
    }

    location  /static {
      alias /opt/mhn/server/mhn/static;
    }
}
vim /etc/nginx/sites-available/mhn-https
server {
    listen              443 ssl spdy;
    server_name         yourdomain.com;

    ssl_certificate     /etc/ssl/private/1_yourdomain.com_bundle.crt;
    ssl_certificate_key /etc/ssl/private/1_yourdomain.com_bundle.key;
    ssl_protocols TLSv1 TLSv1.1 TLSv1.2;
    ssl_ciphers EECDH+CHACHA20:EECDH+AES128:RSA+AES128:EECDH+AES256:RSA+AES256:EECDH+3DES:RSA+3DES:!MD5;
    ssl_prefer_server_ciphers on;
    ssl_session_cache shared:SSL:10m;
    add_header Strict-Transport-Security "max-age=31536000";
    ssl_dhparam /etc/ssl/certs/dhparam.pem;

    if ($ssl_protocol = "") {
        rewrite ^ https://$host$request_uri? permanent;
    }

    location / {
        try_files $uri @mhnserver;
    }

    root /opt/www;

    location @mhnserver {
      include uwsgi_params;
      uwsgi_pass unix:/tmp/uwsgi.sock;
    }

    location  /static {
      alias /opt/mhn/server/mhn/static;
    }
}
vim /etc/nginx/sites-available/honeymap-https
map $http_upgrade $connection_upgrade {
    default upgrade;
    ''      close;
}

server {
    listen   8443 ssl spdy ;
    ssl_certificate /etc/ssl/private/1_yourdomain.com_bundle.crt;
    ssl_certificate_key /etc/ssl/private/1_yourdomain.com_bundle.key;
    ssl_protocols TLSv1 TLSv1.1 TLSv1.2;
    ssl_ciphers EECDH+CHACHA20:EECDH+AES128:RSA+AES128:EECDH+AES256:RSA+AES256:EECDH+3DES:RSA+3DES:!MD5;
    ssl_prefer_server_ciphers on;
    ssl_session_cache shared:SSL:10m;
    add_header Strict-Transport-Security "max-age=31536000";
    ssl_dhparam /etc/ssl/certs/dhparam.pem;

    root /opt/honeymap/client;
    index index.html index.htm;

    server_name yourdomain.com;

    location / {
        try_files $uri $uri/ /index.html;
    }

    location /data/ {
        proxy_pass http://localhost:3000;
        proxy_http_version 1.1;
        proxy_set_header Upgrade $http_upgrade;
        proxy_set_header Connection $connection_upgrade;
    }
}
- Run the follow the enable the sites
ln -fs /etc/nginx/sites-available/mhn-https /etc/nginx/sites-enabled/mhn-https
ln -fs /etc/nginx/sites-available/honeymap-https /etc/nginx/sites-enabled/honeymap-https
Change MHN to support SSL
vim /opt/mhn/server/config.py
SERVER_BASE_URL = 'https://yourdomain.com'
HONEYMAP_URL = 'https://yourdomain.com:8443'
Restart Services & NGINX
supervisorctl status
supervisorctl restart all
service nginx restart
Check your SSL enabled site against SSLLabs and SecurityHeaders.io. Continue to configure HSTS, certificate pinning and harden as your desire.
Check MHN Services
OPTIONAL Stop MHN connecting back to ThreatStream (part of their Optic product/service - nothing is free!)
/opt/mhn/scripts/disable_collector.sh
Finally, just check core MHN services are still running
supervisorctl status
geoloc                           RUNNING
honeymap                         RUNNING
hpfeeds-broker                   RUNNING
hpfeeds-logger-splunk            RUNNING
mhn-celery-beat                  RUNNING
mhn-celery-worker                RUNNING
mhn-collector                    STOPPED
mhn-uwsgi                        RUNNING
mnemosyne                        RUNNING
What each process is doing;
- geoloc - Provides geolocation data (Maxmind GeoLite databases) for the honeymap.
- honeymap – Real-time websocket stream of GPS events on a fancy SVG world map.
- hpfeeds-broker – Honeynet Project generic authenticated datafeed protocol.
- hpfeeds-logger-splunk – Small App for reading from MHN's hpfeeds broker and writing splunk logs.
- mhn-celery-beat - handles asynchronous scheduled tasks (like regenerating the snort signatures).
- mhn-celery-worker - handles asynchronous tasks.
- mhn-collector - Sending data back to ThreatStream for their Optic product.
- mhn-uwsgi – MHN web front end.
- Mnemosyne - Normalizer for honeypot data.
Deploying Honeypots
From here you can log in and start deploying honeypots.
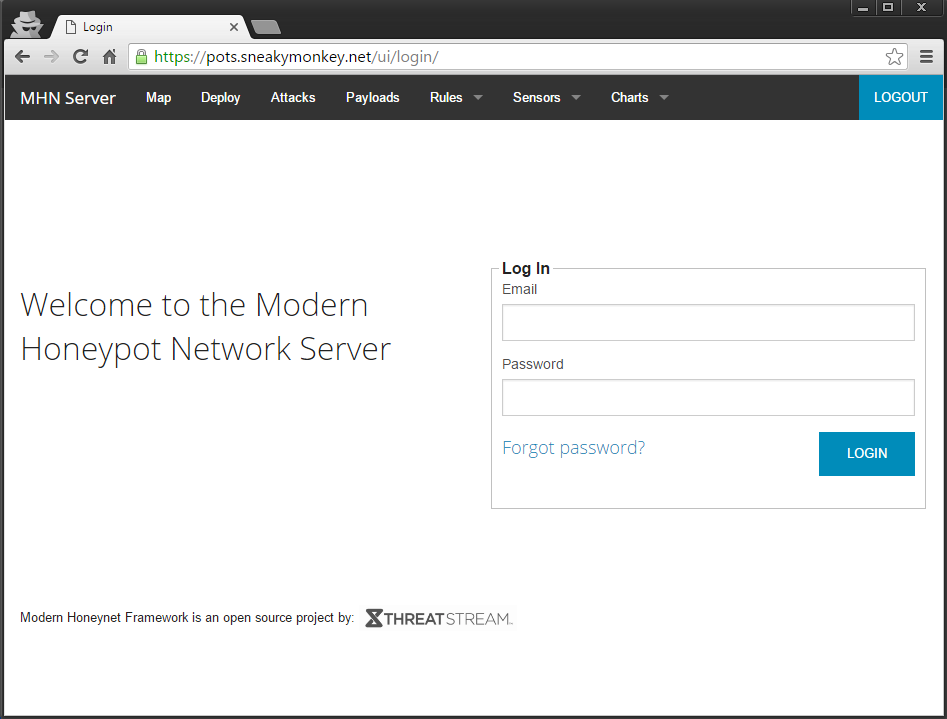
- https://yourdomain.com/ui/manage-deploy/
- Select Script > Honeypot
- Copy the Deploy Command and run that on your honeypot server.
- Check Sensors > View to see your registered honeypot.
- Done.
I'd recommend you play with Cowrie, p0f and Snort at first. Log in to your Cowrie honeypot on the normal port 22 to generate 'attack' traffic to test alerting (log back in on port 2222 for a 'normal' session to administer).
On each of the honeypots I statically set the DNS to not route through Cloudflare. You might not need to do this.
vim /etc/hosts
x.x.x.x yourdomain.com
OPTIONAL Changing the HPFEED port. Needed if you want to route through Cloudflare;
/opt/hpfeeds/broker/feedbroker.py
/opt/hpfeeds/geoloc.json
/opt/hpfeeds/examples/geoloc/geoloc.py
/opt/mnemosyne/mnemosyne.cfg
/opt/mhn/server/collector_v2.py
/opt/honeymap/server/config.json
/opt/mhn/server/mhn/static/registration.txt
find /opt/ -type f -exec grep -H 'HPF_PORT=10000' {} \;
Basic Maintenance
Starting individual services
supervisorctl start <service>
<service>: started
Restart all services.
supervisorctl restart all
Check MongoDB is running
service mongod status
Upgrading MHN Management Server
sudo su -
cd /opt/mhn
git fetch
git stash
git merge origin/master
git stash pop
supervisorctl restart mhn-uwsgi
Check all logs for any errors
tail -n0 -F /var/log/mhn/*
Fixing permission for mhn-celery-worker (if it fails to start)
sudo chown www-data /var/log/mhn/mhn.log
sudo chmod 600 /var/log/mhn/mhn.log
Capture HPFEED data, either on the honeypot or server for troubleshooting.
tcpdump -nnNN tcp port 10000
Check https://github.com/threatstream/mhn/wiki/MHN-Troubleshooting-Guide for further assistance.
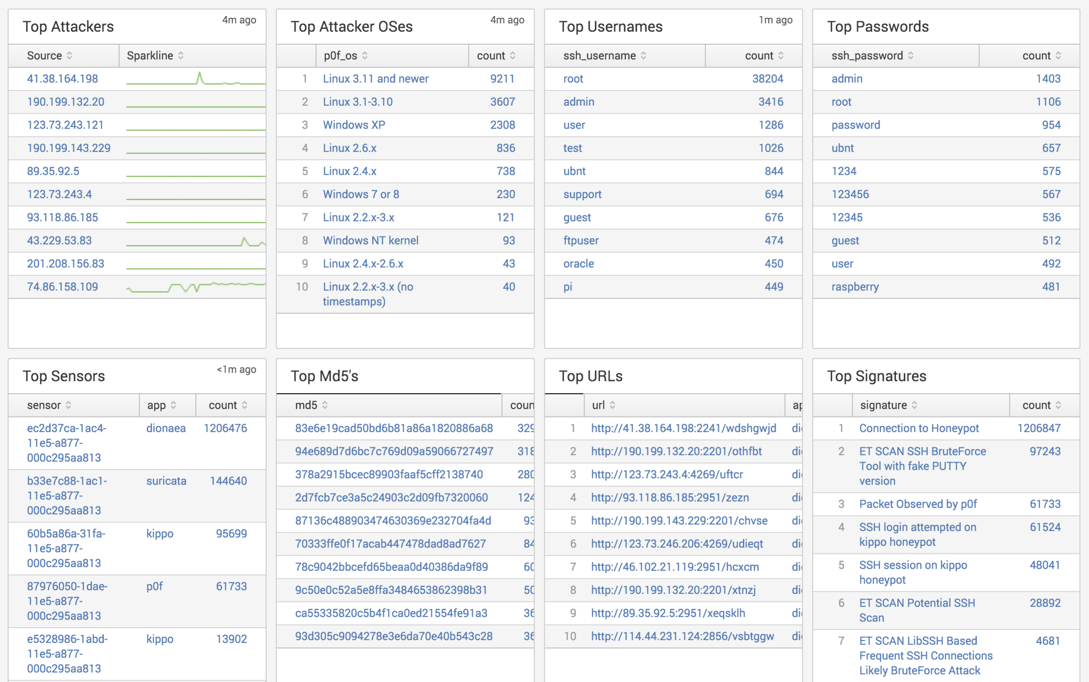
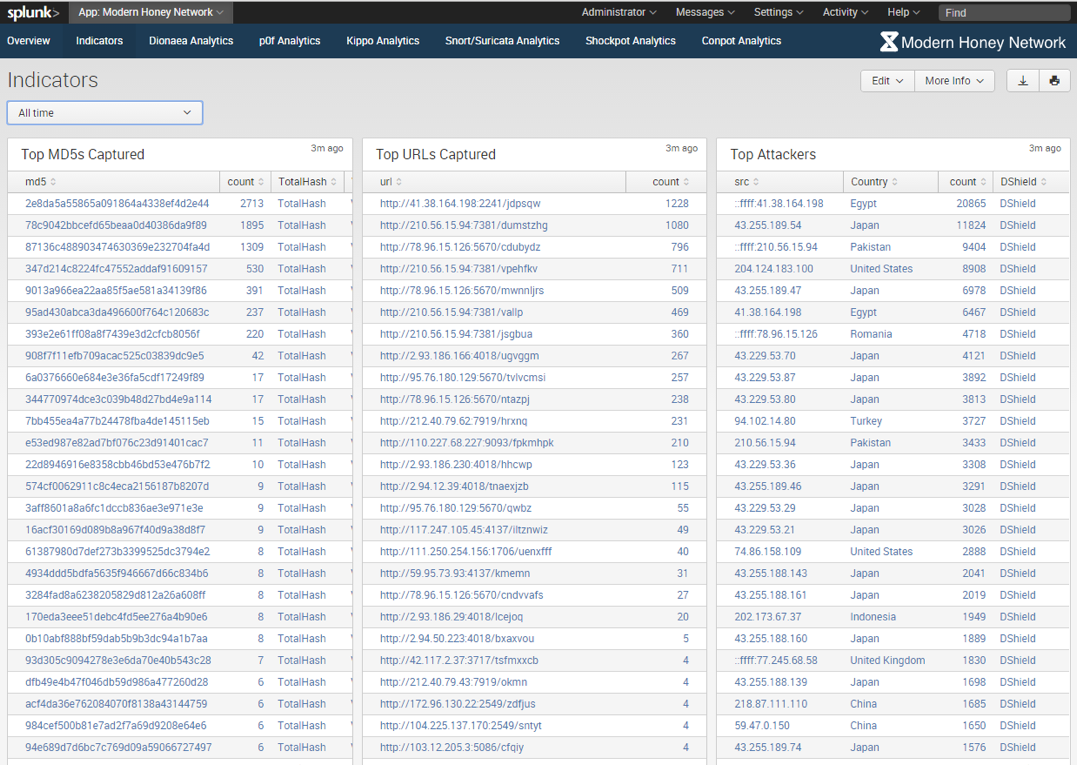
Dashboard Results
To give you an idea, here's some of the data I collected over 1 month. These are the Splunk MHN dashboards available here Splunk MHN App
Further Research
-
Another good project is the Deutsche Telekom AG Honeypot Project TPOT. This system uses an ELK stack with Docker images.
-
Creating your own honeypot will without a doubt enrich your threat intelligence and lower detection rates. https://github.com/paralax/awesome-honeypots
-
Add VPN connectivity to the honeypots MHN Google Group Post.
-
Customise the honeypots to avoid detection. Check out https://honeyscore.shodan.io/ to see if your honeypot is easily detected. Either heavily customise these defaults or create your own.
-
Canary Tokens by Thinkst https://canary.tools/
-
DCEPT by DELL SecureWorks - An Open-Source Honeytoken Tripwire
Legal Note
Things change for everyone if a compromised honeypot or honeynet becomes a springboard to launch additional system attacks. It can also be argued that the establishment of a 'vulnerable' system contributed to the problem and could constitute 'gross negligence'. Monitor your honeynet vigorously and don't turn on and forget.
Resources
- Official MHN GitHub repo
- MHN Troubleshooting Guide
- MHN Support Forum – Google Group
- MHN Official Videos
- Twitter @Anomali
- Bring Back the Honeypots (Blackhat talk by Thinkst)
